💬 Voice appointment booking & confirmation system with Vapi, Gemini & Google Calendar
⚡ 1,846 views · 💬 Support Chatbots
Description
AI Voice Appointment Booking with Vapi and Google Calendar
Build an intelligent appointment booking system that lets customers schedule appointments through natural voice conversations. This workflow connects Vapi AI assistant with Google Calendar to check availability, create appointments, and send professional confirmation emails automatically.
Who’s It For
Healthcare providers, consultants, service businesses, coaches, salons, or any business that schedules appointments and wants to automate booking through voice calls.
What It Does
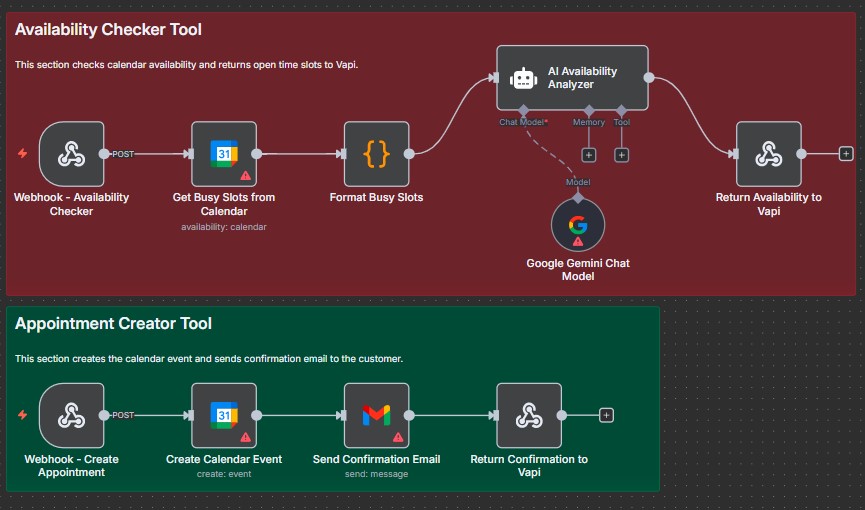
This workflow creates two powerful tools for your Vapi voice assistant:
Availability Checker: When customers ask about available time slots, the assistant calls this workflow which fetches busy times from Google Calendar, processes them through an AI agent, and returns open slots in natural language.
Appointment Creator: Once the customer confirms their preferred time, the assistant triggers this workflow to create the calendar event and send a branded confirmation email with all appointment details.
The entire booking process happens conversationally without requiring customers to navigate websites or apps.
How It Works
Availability Flow:
- Customer asks Vapi assistant to check availability for a specific date
- Vapi calls the first webhook with the requested date
- Workflow queries Google Calendar for busy slots that day
- JavaScript code formats the busy times into readable text
- AI agent analyzes the schedule and identifies available time windows
- Available slots are returned to Vapi in natural language
- Assistant presents options to the customer
Booking Flow:
- Customer confirms their chosen appointment time and provides details
- Vapi calls the second webhook with name, email, date/time, and appointment type
- Workflow creates the calendar event in Google Calendar
- Professional HTML confirmation email is sent via Gmail
- Success confirmation is returned to Vapi
- Assistant confirms the booking to the customer
Requirements
- Vapi account with a configured voice assistant
- Google Calendar for appointment management
- Gmail account for sending confirmation emails
- Google Gemini API key for availability analysis
How to Set Up
1. Activate the Workflow
Import this template and activate it to generate the two webhook URLs.
2. Configure Google Calendar
In both calendar nodes, select your appointment calendar and set your timezone.
3. Connect Gmail
Add your Gmail credentials to the email node and customize the confirmation email template with your branding.
4. Set Business Hours
In the Availability Checker AI agent node, update the system message to reflect your operating hours.
5. Create Vapi Tools
In your Vapi assistant dashboard, add two server tools:
Tool 1: availability_checker
- Function name:
availability_checker - Description: “Checks available appointment slots for a specific date”
- Server URL: Your first webhook URL
- Parameters:
date(string, required, ISO 8601 format)
Tool 2: Creating_the_appointment_and_sending_the_confirmation_email
- Function name:
Creating_the_appointment_and_sending_the_confirmation_email - Description: “Creates appointment and sends confirmation email”
- Server URL: Your second webhook URL
- Parameters:
Name,Email,date and time,Appointment type(all strings, all required)
6. Update Assistant Prompt
Ensure your Vapi assistant knows when to call each tool based on customer requests.
Vapi Configuration
Download the complete Vapi assistant configuration: vapi-config.json
7. Test End-to-End
Call your Vapi assistant and test the complete booking flow.
How to Customize
Appointment Duration: Change the 30-minute default in the “Create an event” node by modifying the .plus(30, 'mins') expression.
Email Template: Edit the HTML in the “Send confirmation email” node to match your brand colors, logo, and messaging.
Business Hours: Update the system message in the “Availability checker” AI agent node to reflect when you accept appointments.
Timezone: Ensure both Google Calendar nodes use your correct timezone for accurate scheduling.
Calendar Selection: Point both calendar nodes to the same Google Calendar to avoid double-bookings.
Appointment Types: Customize the event description format in the “Create an event” node to include relevant details for your business.
This workflow transforms appointment scheduling from a manual back-and-forth into an automated, professional experience that runs 24/7 through voice conversations.
🔗 Nodes Used
Webhook, Google Calendar, Gmail, AI Agent, Google Gemini Chat Model
📥 Import
Download workflow.json and import into n8n:
Workflow menu → Import from File